Scanning an offline endpoint
NAVIGATION  > Organizations > select an organization > select a location >
 ![]() > Download Agent
> Download Agent
PERMISSIONS Datto EDR subscription with administrator-level platform access or Datto AV subscription with administrator-level platform access
PERMISSIONS Service account or administrator-level rights on the target endpoint
If an endpoint cannot connect to the internet due to a network outage or because of security considerations, you can perform manual offline scans of the host and use the Import-ICSurvey function to upload the results to our analysis engine for review.
IMPORTANT An endpoint must have the agent software installed and be associated with a location before our analysis engine can scan it.
What you'll need
-
USB storage drive, readable by the offline endpoint, with at least 512 MB free storage.
-
Administrator-level command prompt access to the offline endpoint.
-
Access to a USB-enabled computer capable of reading the flash drive and connecting to the internet.
Download the agent executable
-
Log in to your EDR instance. In the top navigation bar, click Organizations.
-
Select the organization and the location to which you'll be deploying the agent. For more information, refer to Creating and managing organizations, locations, and devices.
-
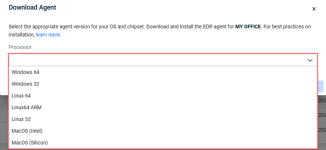
In the Processor drop-down list, select the appropriate agent for the endpoint's operating system.

-
To download the agent to your current computer, click the Download button.

-
Copy the installer to a USB drive. Alternatively, you can email the executable to an end user if you cannot be on site and need them to run the process remotely.
-
Connect the USB drive to the offline endpoint and open a Command Prompt or Terminal session as an administrator. Then, select a topic to continue.
Running the scan
-
From the command line, change your working directory to the executable's location and run the following command.
FileName.exe survey
Replace "FileName" with the name of the executable you downloaded.
EXAMPLE
win32.exe survey
-
The survey utility will run. Once it completes, proceed to the Recovering and importing the survey results section of this article.
-
From the command line, change your working directory to the executable's location and run the following command.
chmod +x rts.FileName.exe
Replace "FileName" with the name of the executable you downloaded.
EXAMPLE
chmod +x rts.linux32.exe
-
Next, launch the installer as a super user. Replace all values in brackets with the values corresponding to your instance.
sudo ./rts.FileName.exe survey
-
The survey utility will run. Once it completes, proceed to the Recovering and importing the survey results section of this article.
Survey process for macOS X El Capitan through Mojave
-
From the command line, change your working directory to the executable's location and run the following command.
sudo chmod +x rts.FileName.exe
Replace "FileName" with the name of the executable you downloaded.
EXAMPLE
chmod +x rts.macos.exe
-
Launch the utility as a super user.
sudo ./rts.FileName.exe
-
The survey utility will run. Once it completes, proceed to the Recovering and importing the survey results section of this article.
Survey process for macOS X Catalina through Monterey
-
Rename the executable to rts.macos.exe.
-
From the command line, change your working directory to the executable's location and run the following command.
-
Run the following commands to make the utility executable and launch it.
cat rts.macos.exe > rts.macos-catalina.exe
chmod +x rts.macos-catalina.exe
sudo ./rts.macos-catalina.exe
-
The survey utility will run. Once it completes, proceed to the Recovering and importing the survey results section of this article.
Recovering and importing the survey results
When the utility finishes running, it will generate a HostSurvey.tar file in one of the following locations:
-
If you ran the utility from the USB drive, you will find the file there.
-
If an end user ran the survey on your behalf, it will be in the same directory from which they ran the executable, and they can email it to you.
Once you have the file in hand, proceed to the Import the results section of this article to continue.
Next, you'll upload the resulting file to Datto EDR for processing. To do so, perform the following steps:
-
From any system with connectivity to the internet, log in to your instance and navigate to Organizations.
-
Select the organization to which the location belongs.
-
Click the name of the location into which you'd like to import the survey. When possible, we recommend that you use the same location with which the offline endpoint is associated.
-
In the upper-right corner of the Location page, click the ellipses menu
 and select Upload Survey File.
-
Drag and drop the HostSurvey.tar file into the Upload Survey File dialog. Then, click Upload Survey.

-
Datto EDR will begin the import. The process may take some time to complete. Once it finishes, the results will appear in the Hosts view of the Analyze page. The format of the file name is agentID_survey.tar, for example he750f34-a9c3-436e-0702-68b74c8f377a_survey.tar. Any issues found will appear on the Alerts page.
Learn more
You can also use the Datto EDR API to export surveys. For more information, refer to Using the API to upload offline scans to the EDR cloud.
| Revision | Date |
|---|---|
|
Running the scan: Windows agent - Deleted rts. prefix from FileName.exe survey. Import results: Step 6 - Added "The format of the file name is agentID_survey.tar..." |
7/2/25 |


