Recommended steps for implementing Datto EDR and Datto AV
This guide describes the steps for implementing Datto EDR and Datto AV.
BEFORE YOU BEGIN It is important that you have reviewed the applicable Getting started article at the beginning of the Getting started with Datto EDR and Datto AV section. The Getting started article guides you through the essential planning tasks that will help you implement Datto EDR and Datto AV successfully.
- Create one organization, add a location, add one or more devices.
- Organizations represent each of your clients at the corporate level and house their unique locations.
- Locations represent either a physical site, such as an office or data center, or a logical grouping of devices within an organization.
- Devices, like servers or workstations, are endpoints to which you will deploy the Datto Endpoint Security agent.
See the article Creating and managing organizations, locations, and devices.
- Deploy the EDR agent.
- The EDR agent software must be deployed to each endpoint you want monitored and protected. To install the agent on an endpoint, see the article Deploying the Datto Endpoint Security agent.
- If you are a Datto RMM customer, you can deploy the agent directly through Datto RMM. This allows you to take advantage of centralized management and familiar functionality within the Datto RMM web interface. See the article Datto Endpoint Security Integration.
If you are a VSA 10 customer, you can deploy the agent through VSA 10. This allows you to take advantage of centralized management and familiar functionality within the VSA 10 web interface. See the article Configuring the VSA 10 integration.
- Configure your network.
- You must configure your networking infrastructure to enable successful communication between your monitored endpoints and the EDR cloud. See the article Endpoint firewall and networking requirements for the Endpoint Security agent.
- You must allowlist executable files to enable real-time scanning on your endpoints. Refer to the article Endpoint allowlisting and antivirus considerations for the Endpoint Security agent.
- Review the default policies.
Default policies are automatically created at the MSP level and assigned to each organization when it is created.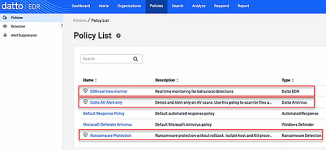
These policies are enabled and pre-configured by default to help you observe how your environment behaves with security measures in place, without disrupting normal network operations.- Datto EDR: This policy performs real-time endpoint analysis and behavior detections.
- Datto Antivirus: This policy is enabled in Alert Only mode meaning files are scanned only.
Malicious files will generate an alert but are not quarantined. The Alert Only mode helps you learn what files, folders, or processes you want to exclude from scanning so they are not flagged as malicious and therefore quarantined.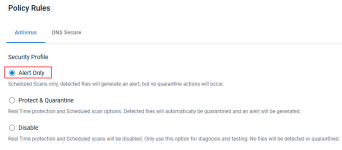
Quick Scan is scheduled automatically with default frequency, days, and time settings. Make sure to choose a schedule when your system resources are least utilized.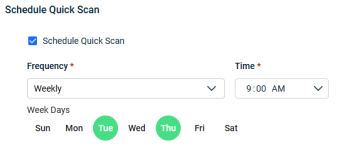
- Ransomware Detection: This policy monitors for ransomware behavior and in the event of detection, it will attempt to isolate the host and kill the suspected process. Ensure that ransomware detection is not enabled in other products such as RMM or RocketCyber. The Rollback and File Recovery feature in the EDR Ransomware Detection policy is only available when the policy is enabled in EDR only.
IMPORTANT It is strongly recommended not to modify the default policy configurations during the implementation phase, except to adjust the Datto Antivirus Quick Scan schedule as needed. These default settings are designed to help you observe how your environment responds with the policies enabled, allowing you to identify any necessary exclusions or alerts that may need to be suppressed.
- Review the alerts that have been generated for the newly created organization:
- On the top menu, click Alerts.
- To review the alerts generated by the Datto AV policy:
- To review the alerts generated by the Datto EDR policy and its related resources:
For details about reviewing individual alerts, see the following articles:
- It is recommended that you review alerts weekly for 30 days to identify items flagged by the system that should be allowed.
- If you want to allow a file or process that caused an AV alert, create an exclusion. See the article Working with exclusions in your Datto AV policy.
- If you want to allow a file or process that caused an EDR alert, create a suppression rule. See the article Suppressing alerts.
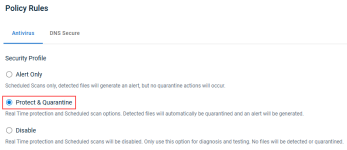
- Once you have worked through the alerts for this new organization for 30 days or a duration of your choosing, we would advise enabling Protect & Quarantine in your Datto AV policy. Now, Datto AV will quarantine malicious files and generate an alert.
- You may want to consider applying an Automated Response policy to the organization or location. Automated response policies are pre-defined detection rules that can carry out recommended actions in response to a threat on an endpoint.
For more information about the Automated Response policy, see the article Working with the Policies page.
| Revision | Date |
|---|---|
| Initial release. |
9/8/25 |

