Deploying the Datto Endpoint Security agent via Kaseya Virtual System Administrator (VSA) 9 and 10
NAVIGATION  > Organizations > select an organization > select a location >
 ![]() > Download Agent
> Download Agent
SECURITY Datto EDR subscription with administrator-level platform access or Datto AV subscription with administrator-level platform access
SECURITY Service account or administrator-level rights on the target endpoint
SECURITY VSA 9: Access to the Application Deploy page
SECURITY VSA 10: Access to create and deploy Windows PowerShell scripts
This article describes the process for deploying the Endpoint Security agent via Kaseya VSA 9 and VSA 10.
If you are directly installing the Endpoint Security agent on an endpoint, refer to Deploying the Datto Endpoint Security agent.
NOTE Datto AV protection is delivered by the Datto Endpoint Security agent and is managed from the Policies page.
Prerequisites
Before you begin, we need to understand your current environment and what you'd like to do.
-
If you're a Datto EDR or Datto AV customer deploying the Endpoint Security agent to endpoints that currently don't have it, proceed to the next section of this article.
-
If you're a Datto EDR or Datto AV customer seeking to enable AV protection on one or more endpoints where the Endpoint Security agent is present, you do not need to redeploy any software. Refer to our Working with the Policies page article.
Index
The workflow you follow depends on the version of VSA you're using. Select a topic to continue.
VSA 10
NOTE We recommend as best practice completing the integration setup between both modules. This eliminates the need to manage a registration key for the location as agents will synchronize automatically to their VSA X synced location. For more information refer to Configuring the VSA 10 integration.
For more information on this topic refer to the Datto EDR and Datto AV Integration article in the VSA X help center.
- In VSA 10, in the left navigation menu, select Configuration > Organizations.
-
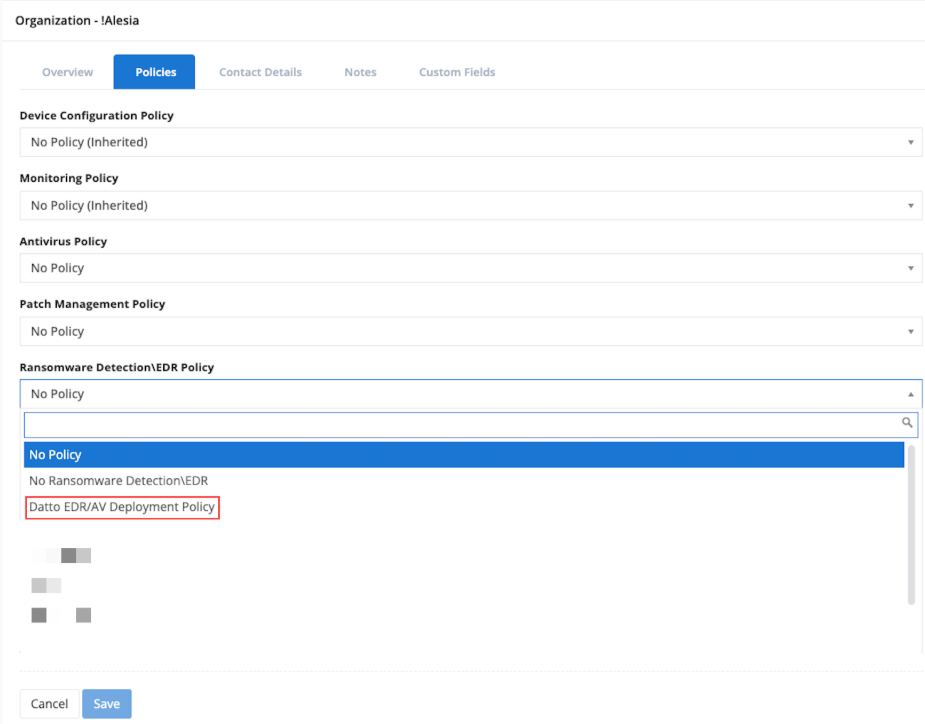
Select the organization, site, or group to which you want to assign the Datto EDR/AV Deployment policy.
-
Click the Policies tab, then click Edit.
-
In the Ransomware Detection\EDR Policy section, assign the Datto EDR/AV Deployment Policy and save changes.

-
Datto EDR/AV Windows agents will be deployed and registered to all targeted devices.

Datto EDR/AV deployment will not be initiated on a system in the following cases:
- The Ransomware Detection agent is installed or was not fully uninstalled.
- The VSA 10 Agent is out of date and does not support EDR (Agent version less than 10.13).
- This endpoint already has EDR installed.
- There is no Datto EDR/AV URL configured.
- Log in to the VSA 10 webapp and navigate to Automation > Scripts.
- Create a new Windows script. For details about how to do so, refer to the Scripts article in the VSA 10 knowledge base.
- Enable the script for the selected platform and select PowerShell as the type.
-
In the script body, enter the following code:
New-Item -Path 'C:\Temp' -ItemType Directory
{{ Invoke-WebRequest -Uri "https://s3.us-east-2.amazonaws.com/infocyte-support/executables/agent.windows64.exe" -OutFile "C:\temp\agent.windows64.exe"}}
{{ C:\temp\agent.windows64.exe --key <EDR KEY> --url <ERD URL>}}
-
Replace <EDR KEY> with the registration key of the location with which you'd like to associate the endpoints receiving this deployment.
-
Replace <EDR URL> with the URL to your instance, such as https://harknessindustries.infoyte.com.
-
Save the script. Then, create a task or scheduled execution to deploy the agent to your target endpoints. For more information refer to the Tasks article in the VSA X help system.
-
If this agent deployment is for or will include Datto AV service, proceed to our article Working with the Policies page.
- Log in to the VSA 10 webapp and navigate to Automation > Scripts.
- Create a new macOS script. For details about how to do so, refer to the Scripts article in the VSA 10 knowledge base.
- Enable the script for the selected platform and select Bash as the type.
- In the script body, enter the following code:
MacOS Intel
sudo curl --silent https://infocyte-support.s3.us-east-2.amazonaws.com/executables/agent.macos.exe --output /usr/local/agent.macos.exe && sudo cp /usr/local/agent.macos.exe /usr/local/rts.macos.exe && sudo chmod +x /usr/local/rts.macos.exe && sudo /usr/local/rts.macos.exe --url <EDR URL> --key <EDR KEY>
MacOS ARM
sudo curl --silent https://infocyte-support.s3.us-east-2.amazonaws.com/executables/agent.macos-arm64.exe --output /usr/local/agent.macos-arm64.exe && sudo cp /usr/local/agent.macos-arm64.exe /usr/local/rts.macos-arm64.exe && sudo chmod +x /usr/local/rts.macos-arm64.exe && sudo /usr/local/rts.macos-arm64.exe --url <EDR URL> --key <EDR KEY>
-
Replace <EDR URL> with the URL to your instance, such as https://harknessindustries.infoyte.com.
-
Replace <EDR KEY> with the registration key of the location with which you'd like to associate the endpoints receiving this deployment.
-
Save the script. Then, create a task or scheduled execution to deploy the agent to your target endpoints. For more information refer to the Tasks article in the VSA X help system.
-
If this agent deployment is for or will include Datto AV service, proceed to our article Working with the Policies page.
- Log in to the VSA 10 webapp and navigate to Automation > Scripts.
- Create a new Linux script. For details about how to do so, refer to the Scripts article in the VSA 10 knowledge base.
- Enable the script for the selected platform and select Bash as the type.
- In the script body, enter the following code:
Linux AMD x64
sudo curl --silent https://infocyte-support.s3.us-east-2.amazonaws.com/executables/agent.linux64.exe --output /usr/local/agent.linux64.exe && sudo cp /usr/local/agent.linux64.exe /usr/local/rts.linux64.exe && sudo chmod +x /usr/local/rts.linux64.exe && sudo /usr/local/rts.linux64.exe --url <EDR URL> --key <EDR KEY>
Linux AMD x32
sudo curl --silent https://infocyte-support.s3.us-east-2.amazonaws.com/executables/agent.linux32.exe --output /usr/local/agent.linux32.exe && sudo cp /usr/local/agent.linux32.exe /usr/local/rts.linux32.exe && sudo chmod +x /usr/local/rts.linux32.exe && sudo /usr/local/rts.linux32.exe --url <EDR URL> --key <EDR KEY>
Linux ARM x64
sudo curl --silent https://infocyte-support.s3.us-east-2.amazonaws.com/executables/agent.linux-arm64.exe --output /usr/local/agent.linux-arm64.exe && sudo cp /usr/local/agent.linux-arm64.exe /usr/local/rts.linux-arm64.exe && sudo chmod +x /usr/local/rts.linux-arm64.exe && sudo /usr/local/rts.linux-arm64.exe --url <EDR URL> --key <EDR KEY>
-
Replace <EDR URL> with the URL to your instance, such as https://harknessindustries.infoyte.com.
-
Replace <EDR KEY> with the registration key of the location with which you'd like to associate the endpoints receiving this deployment.
-
Save the script. Then, create a task or scheduled execution to deploy the agent to your target endpoints. For more information refer to the Tasks article in the VSA X help system.
-
If this agent deployment is for or will include Datto AV service, proceed to our article Working with the Policies page.
VSA 9
-
Download the agent executable applicable to your endpoint from
 > Organizations > select an organization > select a location >
  > Download Agent.
 -
Upload the Endpoint Security agent to Kaseya VSA.
-
Copy the code in the Sample Windows XML section of this article to a text editor.
-
Make the following changes to the XML:
-
Update the WriteFile line with the name of the Windows installer downloaded from EDR and uploaded into VSA, including any applicable file extension.
-
Edit the executeShellCommand line to use the registration key of the location with which the agent should be associated and the cname or full URL of your EDR instance (such as https://mycompanyname.infocyte.com/).
-
Change the name of agent.windows64.exe to DeployDattoEDR.exe.
-
<?xml version="1.0" encoding="utf-8"?>
<ScExport xmlns:xsi="http://www.w3.org/2001/XMLSchema-instance" xmlns:xsd="http://www.w3.org/2001/XMLSchema" xmlns="http://www.kaseya.com/vsa/2008/12/Scripting">
<Procedure name="Datto EDR Windows Install" treePres="3" id="668664158" folderId="244411507222993" treeFullPath="myProcedures - myemail@example.com">
<Body description="">
<Statement description="Ensure your Windows installer is referenced correctly here" name="WriteFile" continueOnFail="false">
<Parameter xsi:type="StringParameter" name="Path" value="#vAgentConfiguration.agentTempSecureDir#/DeployDattoEDR.exe" />
<Parameter xsi:type="StringParameter" name="ManagedFile" value="VSASharedFiles\DeployDattoEDR.exe" />
<Parameter xsi:type="BooleanParameter" name="DeleteAfter" value="False" />
</Statement>
<Statement description=" Replace --key < TARGET_GROUP> --url <URL> with your own registry key and URL" name="ExecuteShellCommand" continueOnFail="false">
<Parameter xsi:type="StringParameter" name="Command" value="#vAgentConfiguration.agentTempSecureDir#/agent.windows64.exe --quiet --key < TARGET_GROUP> --url <URL>" />
<Parameter xsi:type="EnumParameter" name="ExecuteAccount" value="System" />
<Parameter xsi:type="BooleanParameter" name="Is64Bit" value="True" />
</Statement>
</Body>
</Procedure>
</ScExport> -
Download the agent executable applicable to your endpoint from
> Organizations > select an organization > select a location > > Download Agent. -
Upload the macOS Endpoint Security agent to Kaseya VSA.
-
Make a copy of the template and rename to your test or production filename.
-
Make the following changes to the XML:
-
Update the WriteFile line with the name of the macOS installer downloaded from EDR and uploaded into VSA, including any applicable file extension.
- Locate the "Update with your personal instance key and URL and execute the file" comment. Change the line below it to use the registration key of the location with which the agent should be associated and the cname or full URL of your EDR instance (such as https://mycompanyname.infocyte.com/)
-
<?xml version="1.0" encoding="utf-8"?>
<ScExport xmlns:xsi="http://www.w3.org/2001/XMLSchema-instance" xmlns:xsd="http://www.w3.org/2001/XMLSchema" xmlns="http://www.kaseya.com/vsa/2008/12/Scripting">
<Procedure name="Datto_macOS-TEMPLATE" treePres="3" id="147352975" folderId="574889912910242" treeFullPath="DZYNE Procedures.macOS Procedures">
<Body description="">
<Statement description="Upload Datto macOS agent to your Kaseya instance
Write file and set the file destination path as such #vAgentConfiguration.agentTempSecureDir#/datto.mac.exe " name="WriteFile" continueOnFail="false" osType="MacOS">
<Parameter xsi:type="StringParameter" name="Path" value="" />
<Parameter xsi:type="StringParameter" name="ManagedFile" value="" />
<Parameter xsi:type="BooleanParameter" name="DeleteAfter" value="False" />
</Statement>
<Statement description="for silicon chip" name="Execute Shell Command - Get Results to Variable" continueOnFail="false">
<Parameter xsi:type="StringParameter" name="Parameter1" value="uname -m" />
<Parameter xsi:type="StringParameter" name="Parameter2" value="False" />
<Parameter xsi:type="StringParameter" name="Parameter3" value="System" />
</Statement>
<If description="">
<Condition name="CheckVariable">
<Parameter xsi:type="StringParameter" name="VariableName" value="#global:cmdresults#" />
<Parameter xsi:type="EnumParameter" name="Condition" value="Contains" />
<Parameter xsi:type="StringParameter" name="Value" value="arm64" />
</Condition>
<Then>
<Statement description="If apple Silicon chip install rosetta" name="WriteScriptLogEntry" continueOnFail="false">
<Parameter xsi:type="StringParameter" name="Comment" value="Mac contains Apple Silicon chip. Installing Rosetta" />
</Statement>
<Statement name="ExecuteShellCommand" continueOnFail="false" osType="MacOS">
<Parameter xsi:type="StringParameter" name="Command" value="softwareupdate --install-rosetta" />
<Parameter xsi:type="EnumParameter" name="ExecuteAccount" value="System" />
<Parameter xsi:type="BooleanParameter" name="Is64Bit" value="False" />
</Statement>
<Statement name="PauseScript" continueOnFail="false">
<Parameter xsi:type="IntegerParameter" name="Seconds" value="20" />
</Statement>
</Then>
<Else>
<If description="">
<Condition name="CheckVariable">
<Parameter xsi:type="StringParameter" name="VariableName" value="#global:cmdresults#" />
<Parameter xsi:type="EnumParameter" name="Condition" value="Contains" />
<Parameter xsi:type="StringParameter" name="Value" value="x86_64" />
</Condition>
</If>
<Statement name="WriteScriptLogEntry" continueOnFail="false">
<Parameter xsi:type="StringParameter" name="Comment" value="Mac contains Intel Processor" />
</Statement>
</Else>
</If>
<Statement description="Execute chmod command and set the file as executable" name="ExecuteShellCommand" continueOnFail="false" osType="MacOS">
<Parameter xsi:type="StringParameter" name="Command" value="chmod +x /#vAgentConfiguration.agentTempSecureDir#/datto.mac.exe " />
<Parameter xsi:type="EnumParameter" name="ExecuteAccount" value="System" />
<Parameter xsi:type="BooleanParameter" name="Is64Bit" value="True" />
</Statement>
<Statement description="Update with your personal instance key and URL and execute the file" name="ExecuteShellCommand" continueOnFail="false" osType="MacOS">
<Parameter xsi:type="StringParameter" name="Command" value="sudo /#vAgentConfiguration.agentTempSecureDir#/datto.mac.exe --key < TARGET_GROUP> --url <URL>" />
<Parameter xsi:type="EnumParameter" name="ExecuteAccount" value="System" />
<Parameter xsi:type="BooleanParameter" name="Is64Bit" value="True" />
</Statement>
<Statement description="clean up" name="DeleteFile" continueOnFail="false">
<Parameter xsi:type="StringParameter" name="Path" value="#vAgentConfiguration.agentTempSecureDir#/#global:cmdresults#" />
</Statement>
<Statement name="DeleteFile" continueOnFail="false" osType="MacOS">
<Parameter xsi:type="StringParameter" name="Path" value="#vAgentConfiguration.agentTempSecureDir#/datto.mac.exe" />
</Statement>
<Statement description="log Entry" name="WriteScriptLogEntry" continueOnFail="false">
<Parameter xsi:type="StringParameter" name="Comment" value="DattoAgent: Installed" />
</Statement>
</Body>
</Procedure>
</ScExport> -
Save the changes to the XML file.
-
Upload the Datto Endpoint Security agent installer executable to the Agent Procedures > Manage Files area in VSA.
-
In the Schedule / Create section of VSA, create a new procedure.
-
When loaded into the procedure editor, the above XML will look similar to the example shown below.

Customize the following values to match your environment:
-
Line 1: Point the "WriteFile" option to where you have uploaded your agent installer.
-
Line 2: Enter the user logon credentials for the endpoint.
-
Line 3: Change the key and the URL.
-
-
Follow the process described in Application Deploy to install the Endpoint Security agent on the target machine via VSA.
-
If this agent deployment is for or will include Datto AV service, proceed to our article Working with the Policies page to continue.
Additional resources
The following knowledge base content will help you get the most out of your integration:
| Revision | Date |
|---|---|
| VSA 9 Windows step 4: Added bullet - Change the name of agent.windows64.exe to DeployDattoEDR.exe. | 5/14/25 |
| Updated VSA 10 section. | 9/3/25 |


