Responding to alerts
NAVIGATION Alerts > ![]() Respond
Respond
PERMISSIONS To manage the quarantine: Datto AV subscription with administrator, analyst, or external analyst-level platform access
PERMISSIONS To upload and enable extensions: Datto EDR subscription with administrator-level platform access
PERMISSIONS To deploy response extensions: Datto EDR subscription with analyst-level platform access
BEFORE YOU BEGIN Response extensions are only available with an EDR subscription. If you do not have this service, you will only have access to the Quarantined Files page.
The Endpoint Security platform equips you with multiple options for immediate threat assessment and triage when an alert occurs. If you're a Datto AV subscriber, you'll have access to the quarantine feature, a powerful tool that enables isolation and containment of malicious activity on an endpoint. Datto EDR subscribers can deploy a wide variety of response extensions to affected devices, allowing for immediate remote remediation and recovery actions without the need to schedule a technician site visit.
The Endpoint Security platform provides you with multiple options to immediately triage the threat and stop the spread of malicious activity. If you're a Datto AV subscriber, you'll leverage the quarantine to do so. Datto EDR subscribers can leverage response extensions to do so.
This article describe how to manage quarantined files and activate and deploy response extensions. To learn about the Respond page, refer to Navigating the Respond page.
Datto AV
Datto AV includes a quarantine feature that enables you to isolate suspicious files for future analysis, decontamination, or deletion. Quarantined files persist within a dedicated holding area on the impacted endpoint's hard drive until you restore or remove them.
IMPORTANT This feature is only available to Datto AV subscribers. Uninstalling the Datto AV agent permanently deletes the quarantine and all of its isolated files.
You can review, restore, and delete quarantined files on the Respond page. To do so, perform the following steps:
-
In the top navigation menu, click Respond.
-
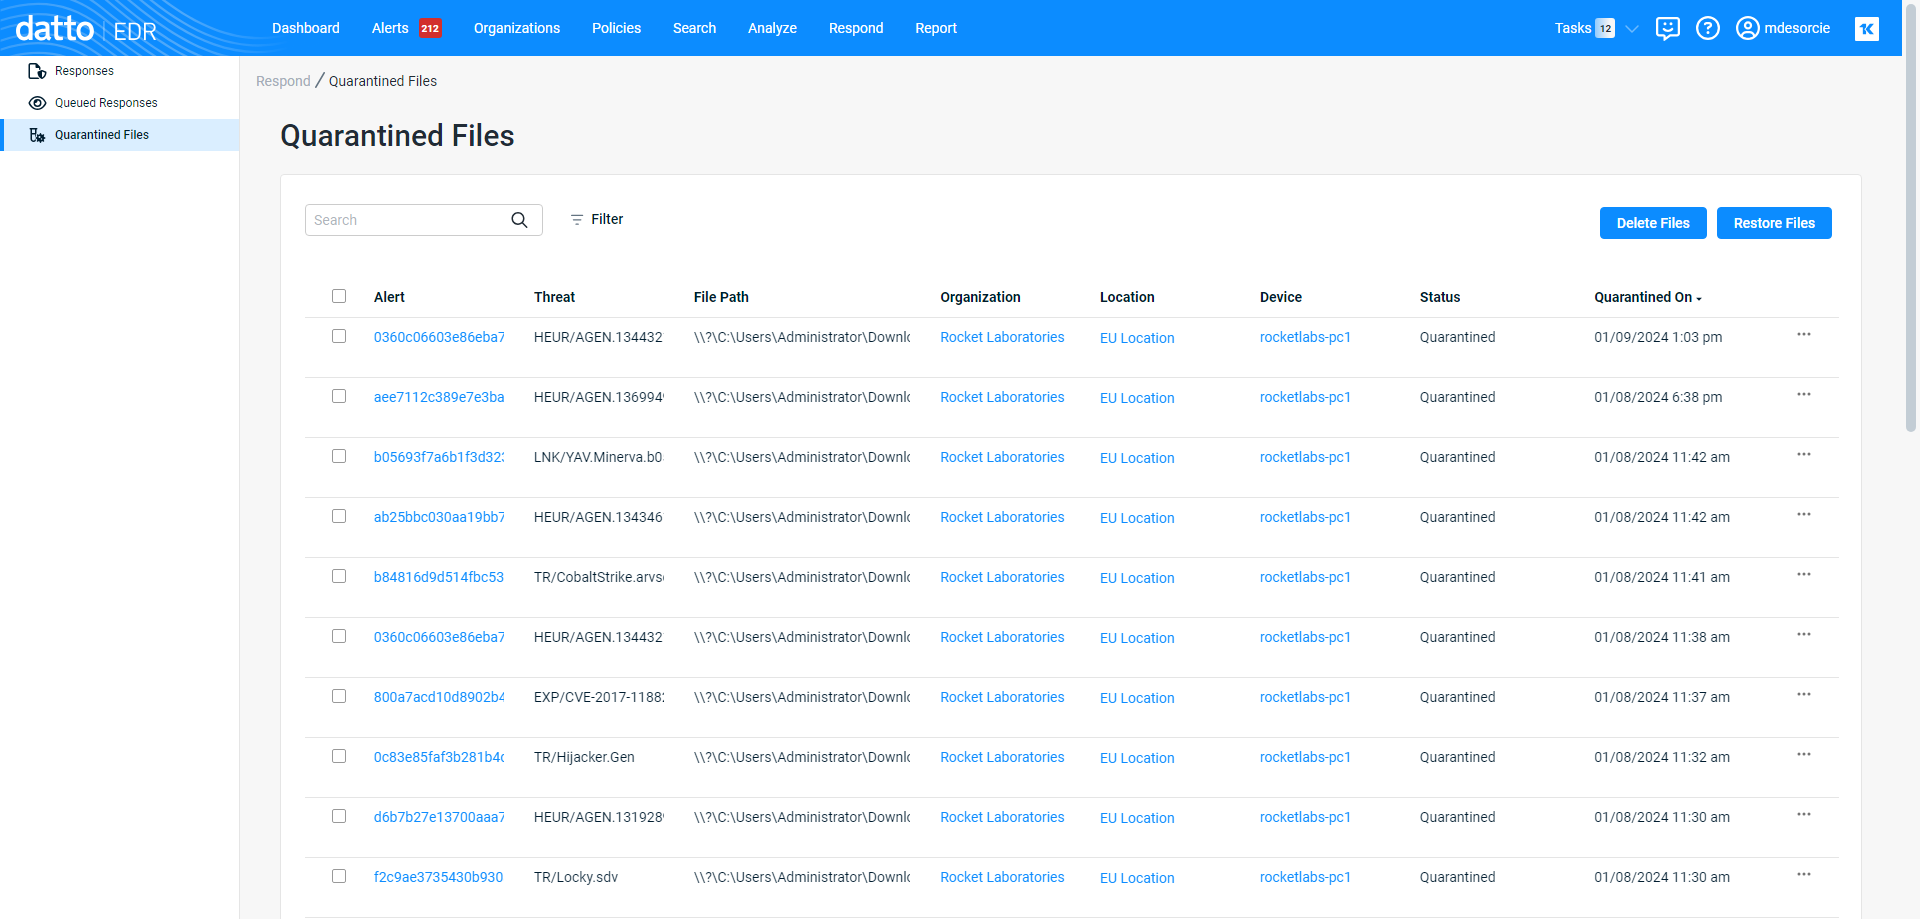
The page will load. In the side navigation bar, click Quarantined Files.
-
You'll see a table populated with files that the Endpoint Security agent identified as potentially malicious and automatically quarantined.
-
As you navigate, you'll see the following features and fields:
Features
| Feature | Definition |
| Search field |
Enter a partial or whole value to filter the records displayed. |
| Filter |
Includes or excludes results in the report based on Host, Organization, and Location. Status values, and on From and To dates. Numeric value appearing next to this button indicates number of filters currently applied. |
| Delete Files |
Deletes the selected file(s) from the device. |
| Restore Files |
Restores the selected file(s). |
IMPORTANT If some features, like restore files, are not available, verify that the Real-time Protection Scan feature OR the Alert-Only Action on Detection feature is enabled for your Datto Antivirus policy. Both features should not be enabled at the same time.
Fields
NOTE Clicking any link in the table will open the alert, organization, location, or device detail page for the selected object.
| Column header | Definition |
|
Alert |
The unique ID of the alert associated with the quarantine action |
|
Threat |
The specific cataloged threat or vulnerability that the object appears to match |
|
File Path |
Full path on the impacted endpoint where the suspicious object was found |
|
Organization |
Name of the organization associated with the object |
| Location | Identity of the location associated with the object |
|
Device |
The hostname of the device on which the suspicious object was found |
|
Status |
Indicates the current status (Quarantined, Restored, Deleted) of the object |
| Quarantined On | The time and date at which the analysis engine observed the object |
|
|
Actions menu; enables you to delete or restore the object |
Datto EDR
Datto EDR subscribers have the ability to deploy executable files called "response extensions" to impacted endpoints to perform automated mitigation actions. We call this functionality "Click to Respond."
IMPORTANT Response extensions are only available with an EDR subscription. If you do not have this service, you will only have access to the Quarantined Files page.
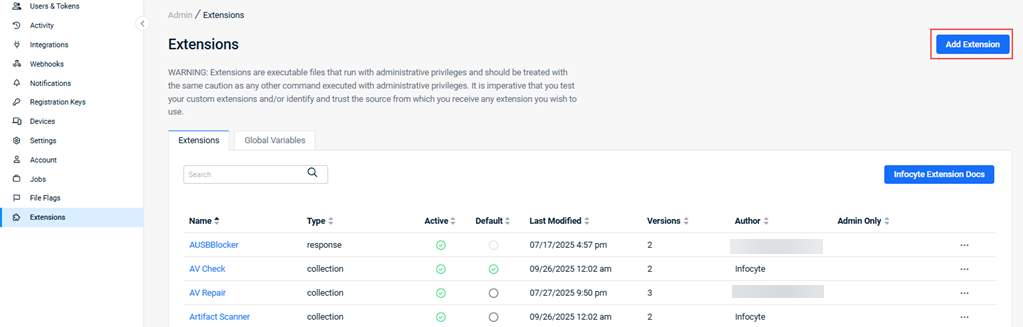
Before you can use extensions, you must enable them. To do so, perform the following steps:
-
In your EDR platform, navigate to
 > Admin > Extensions.
 -
The Extensions page will load.
-
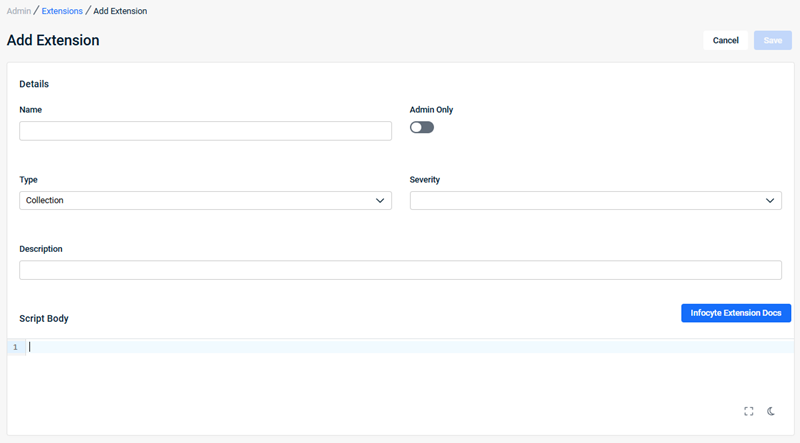
To create a new deployable solution, click Add Extension.
-
Complete all applicable fields and then click Save.
-
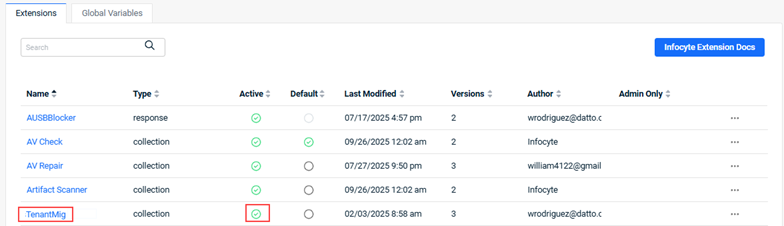
The new extension is listed in the Extensions table and is enabled by default. To disable an extension, clear the option in the Active field.
Once you've enabled the response actions you'd like to use, perform the following steps to deploy them to an endpoint:
-
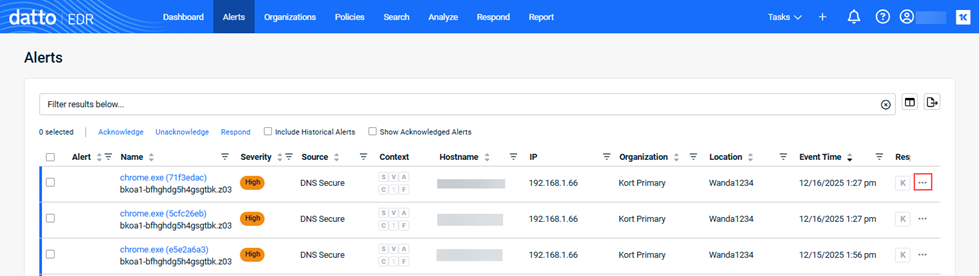
In the top navigation menu, click Alerts.
-
The Alerts page will load. Locate the alert to which you'd like to respond. At the end of the alert's row, click the ellipsis menu and select Respond in the pop-up menu.
- In the Responding dialog box, select the desired response. To filter the content list, enter a string in the search box.
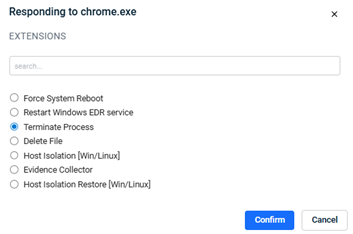
- Click Confirm.
-
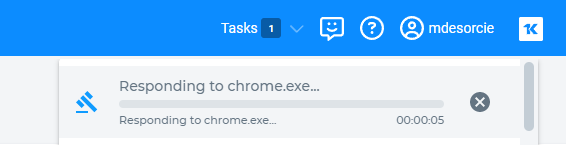
A response task will appear in your Tasks queue.
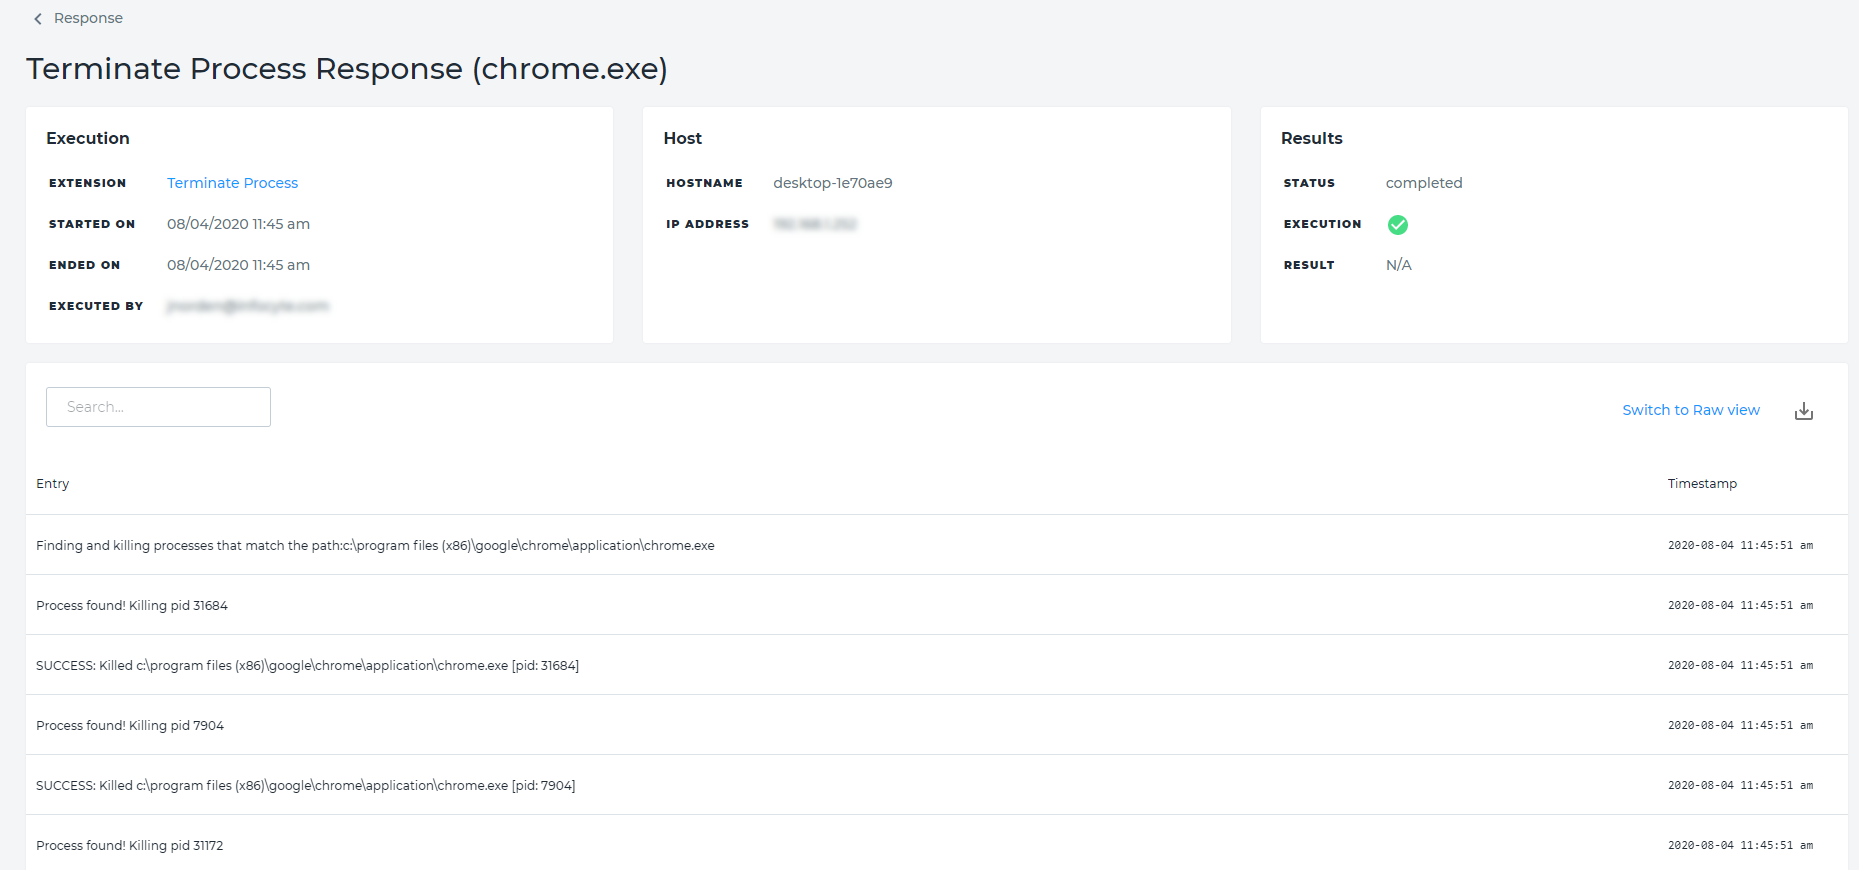
-
Once the task completes, you can review its results by clicking the Respond tab in the top navigation bar and then clicking the name of the alert object to which you responded.
-
The response details will load.
You can configure any enabled extension to run at each scan interval. To do so, perform the following steps:
-
In the top navigation bar, click Organizations.
-
Select a location.
-
Click Scan. The scan configuration options for the selected location will open.
-
Click Extension Options. To designate extensions that should run during each scan, click the
 icon next to its name. The deployable solution you've selected will move into the Selected Extensions column. To remove an extension from the scan, click the corresponding
  icon.
icon.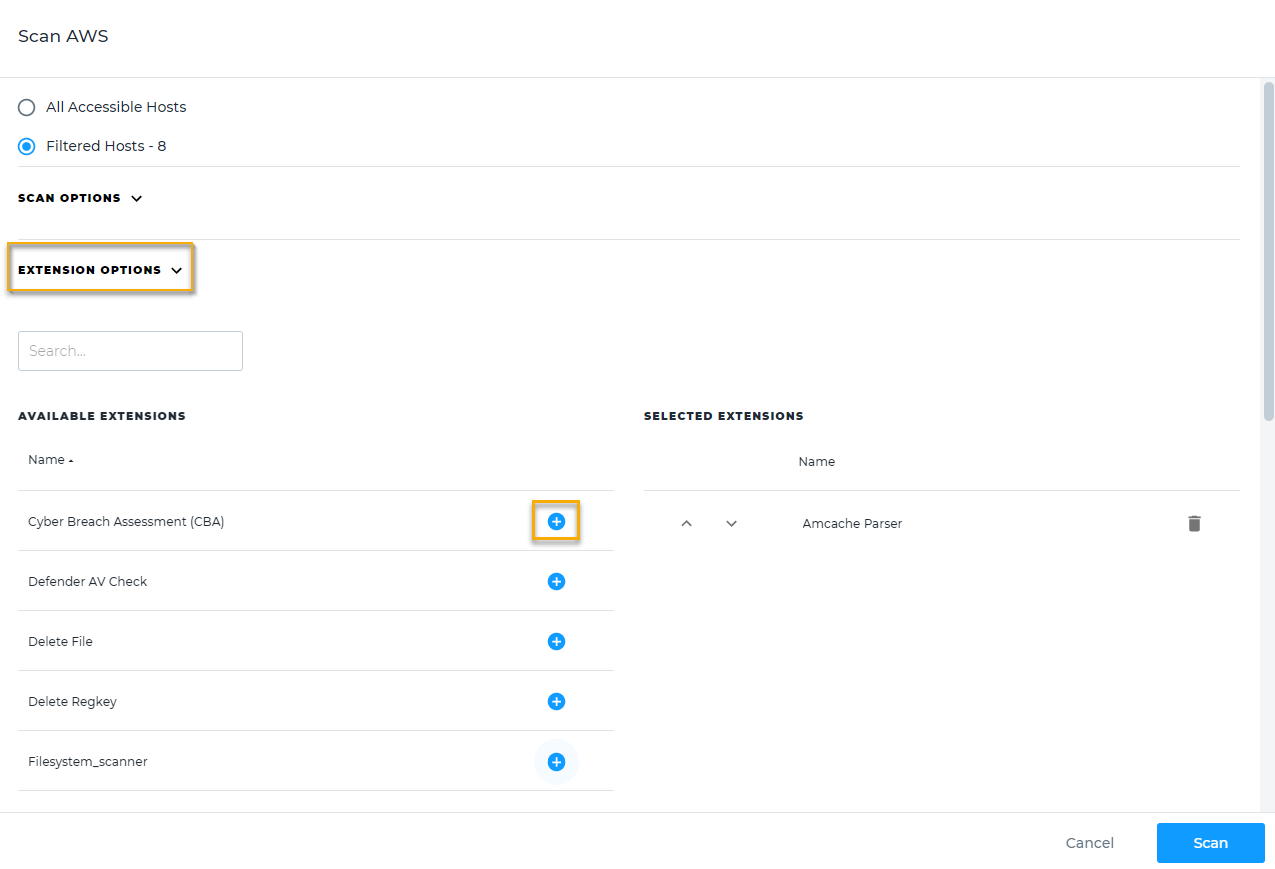
Good to know
For extensions and response options to work, the Endpoint Security agent must be active on the target machine. You can either permanently install the agent on the endpoint or initiate a new scan for its location to make the agent active before responding to the alert.
To learn more about creating and working with extensions, refer to Leveraging collection and response extensions. For information about creating suppression rules to reduce false-positive alerts, review our Suppressing alerts article.
| Revision | Date |
|---|---|
| AV features - Delete files: Edited - Deletes the selected file(s) from the device. Deleted Note: This does not delete the file from the computer. | 10/23/25 |
| Updated PRs/screenshots. | 12/30/25 |


