Creating Target Groups, adding Agents, and Queries
ALERT LEGACY ARTICLE: The content in this article is no longer updated and is available for reference purposes only. Features and workflows described may be deprecated, significantly changed, or no longer supported.
Environment
- Datto EDR
Description
Target Groups
Target Groups are groupings of endpoints or IP ranges. Data collected during the scan is always associated with a target group for analysis and reporting. Target groups assist you and your team in logically dividing your network by location, function, asset type, or any other logical division. Additionally, Target Groups allow for Real-Time Security Monitoring and Scheduled deep scans.
Devices are added to a Target Group by either creating a Query and Enumerating to discover devices, or by adding specific installed agents to the Target Group.
To create your first target group, navigate to the Discover Tab, select Add New Target Group and provide a descriptive name.

Pro-Tip: Target groups can contain machines discovered by both Agent and Agentless methodologies.
Adding Agents to a Target Group
Agents can be enabled and assigned to Target Groups at the time of Agent Installation with an Agent Registration Key, or can be enabled and assigned manually after installation.
Agent Registration key
Host / Agent association with a default Target Group will happen automatically if an Agent Registration Key is generated and used during the installation of an Agent (See the Agent Installation Article).
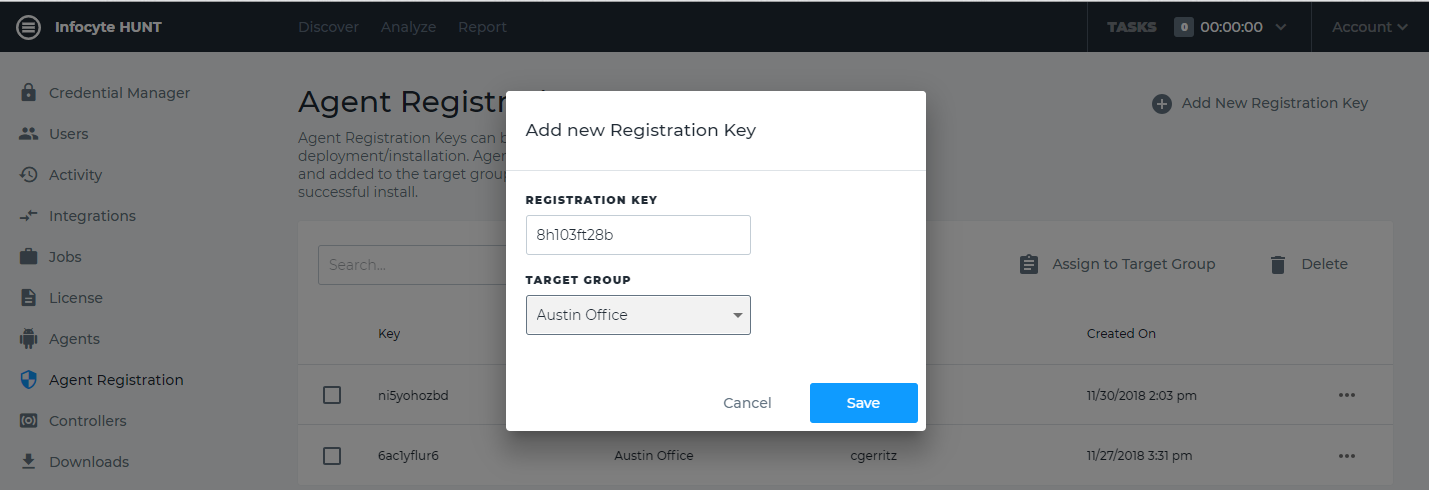
1. Create a Registration Key to install agents by clicking âAdd New Registration Key within the Agent Registration admin panel.
2. Assign the Registration Key to the desired Target Group.
3. Utilize the Registration Key during the installation process.
Agents installed with a Registration Key will automatically be approved and added to the default target group selected.
Manually adding agents to target groups
To add agents to a designated Target Group navigate to the profile icon in the top right corner, select Admin, and navigate to Agents on the left navigation pane. If you have not previously enabled the Agent, click on the ellipses to the right of the Agent and select Enable.
Once the desired Agents are enabled, select one or more Agents to add to a Target Group and click the Add To Target Group button in the right corner.

then select the desired Target Group and click Save.

Queries (Agentless)
Asset Discovery is a necessary step for agentless scanning and is supported by defining Queries which can be a list of hostnames, IP Addresses, IP Ranges, CIDR Blocks or AD/LDAP domains.
These queries dictate membership into Target Groups anytime the agentless architecture is used.
Prerequisites
- Domain or Local Admin Credentials configured and input for use in Datto EDR.
Search Credential Manager for more information. - An existing Target Group.
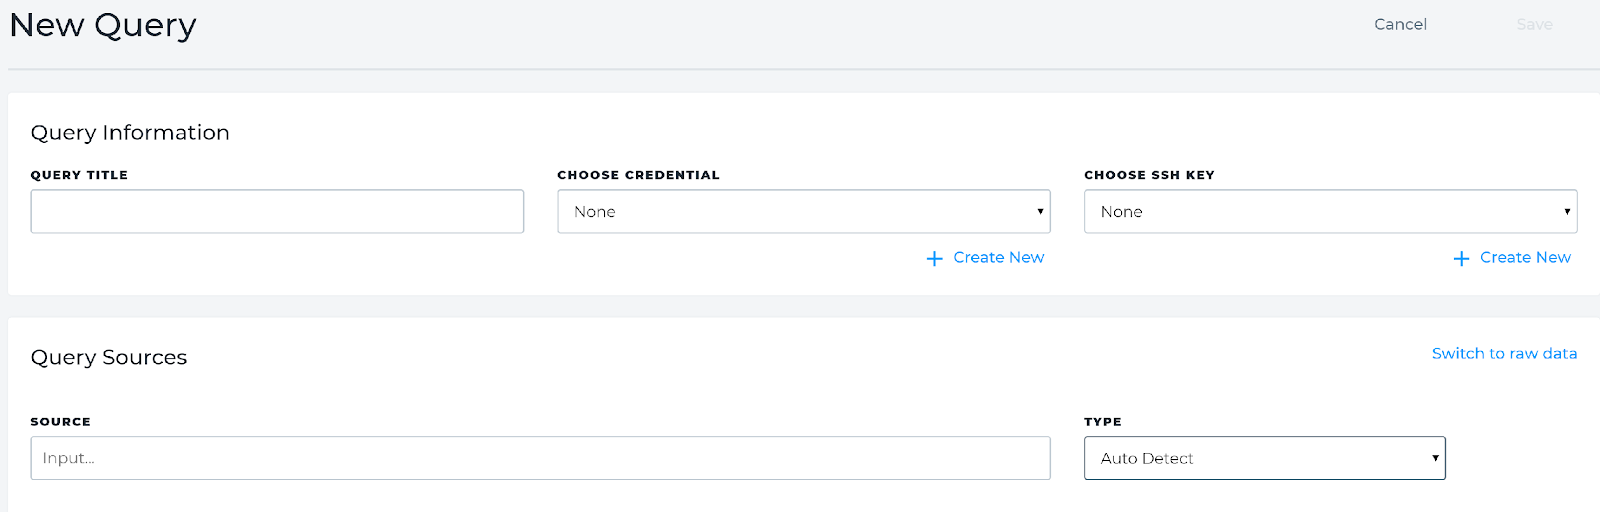
Creating a query
- Under the Discover tab select the Target Group for the new Query.
- Click the Add Query Button


- Provide a Friendly Name for the Query (utilized to identify the query during enumeration tasks).
- Select the Credentials for the Query to use.
- Select SSH Credentials if Applicable.
- Select a query type, or alternatively leave the type set to Auto Detect.
Proper format is needed to utilize the Auto Detect option.
CIDR [XXX.XXX.XXX.XXX/(bit)]
IP Scope [XXX.XXX.XXX.XXX - XXX.XXX.XXX.XXX]
Domain [ldap://FQDN]
Hostname [FQDN]
IP Address [XXX.XXX.XXX.XXX]
Pro-Tip: An alternate method of copy and pasting in the above formats can be accomplished via the Raw Data Option. - Save the Query
- Once you have saved a query, you can enumerate the query to find all of the devices specific to it. You do so by clicking the Find Host button. This step may take a good amount of time depending on the size of the query.